
If you are a freebie lover or addicted designs collector, or even a digitizer yourself, I bet you keep compiling testing samples just like I do. Besides really poor stitchouts, I’m unable to throw away almost anything.
Being a digitizer myself, most of my embroidered samples are stitchouts of my own designs. I put extreme effort into the testing so I have many of them. And I mean MANY! 99% of them are top quality since thanks to contemporary digitizing softwares most of possible mistakes can be caught during the digitizing process already. But I like to play with colours and materials so I make a lot of design variations.
Some of these samples are used up for creating projects that accompany the new set release. I like to show my customers what can be done with the desing. Some I gift to my friends or customers knowing they make a good use of out them. But still there are a lot of stitchouts left.
And their time comes when I have a day when I “just want to sew something”. I sew all of my garments but sometimes I don’t feel like I want to measure and fit to figure and even find the pattern and decide where I’m gonna wear the garment. And sewing something easy and quick, like a pillow or toilet bag that doesn’t require much thinking and I can sew while listening to podcast or audiobook, that is just the right activity that can even revive fading sew-jo.
So one rainy evening the following setup was compiled on my table:

And I shot little photo-series to show the process of the making. Hope it is clear as it is, without any text.
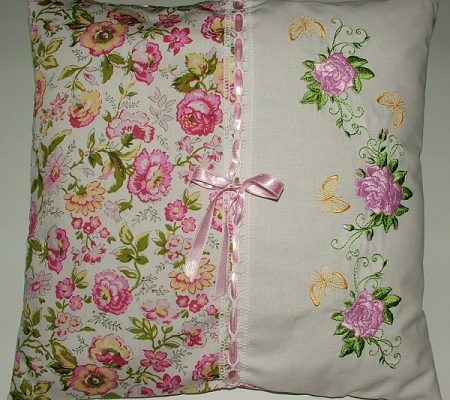
I have used and endless zipper, designs are from my Gardenias collections. Finished size of the pillow is 40×40 cm (16×16″).


Voilà! Pillow is done. Embroidered panel can be orientated vertically or horizontally, both versions look good.


Hope you like this mini photo tutorial.
Until the next time, happy embroidering.![]()
Tak tento příspěvek mně přišel právě vhod. Mám koupenou a předepranou látku na polštáře, jen nejhorší je pro mě vždy vše poměřit a odhodlat se střihnout do látky, kolik přidat na švy atd. Teď už vím, že na švy přidávat nebudu a zipy jsem jako samouk v minulosti všívala složitěji. Teď se na ty povlaky na polštáře úplně těším. Děkuji za inspiraci a praktické rady.