Free Machine Embroidery Design for Download
This week’s Freebie Friday embroidery was a little late and is only arriving on Tuesday. But the good news is that it will be available to download until the end of the week.
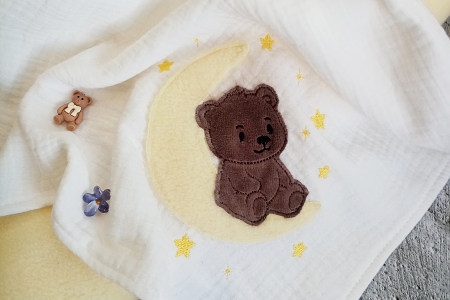
After my traditional flowers, I decided to do something a little different. Today’s design belongs to the children’s and appliqué categories. It is also a slightly different type of appliqué than the ones I usually create. And there’s another change: this design is made for larger embroidery hoops – size of the design is 120 × 150 mm (5 × 6″).
It is perfect for children’s clothing, lovey blankets, cushions, baby blankets, nursery decorations and many other projects.

You can use up small scraps of fabric for this design. I recommend using knits and other non-fraying fabrics.
If you want to give the design a lovely three-dimensional effect, try fabrics with a pile or fluffy surface, such as baby plush, fleece or various types of furry knits.
When using this type of fabric, don’t forget to place a piece of water-soluble stabilizer on top of the fabric while embroidering. This prevents the stitches from sinking into the long fibers. Once the embroidery is finished, the stabilizer can simply be torn away or dissolved in water.
The appliqué uses only straight stitches, so the entire design contains fewer than 4,000 stitches and will stitch out very quickly.

New to appliqué?
If you have been embroidering for a while, you probably know exactly what to do and can simply scroll down to the bottom of the page to download the design.
But if you are new to appliqué, I’ll show you the whole process here. I know that many embroiderers are a little afraid of appliqué – but in my opinion, there is really no reason to be!
What you will need
- your base fabric
- scraps of fabric for the appliqué – you will need one for the moon and another for the teddy bear
- embroidery threads in the required colors
- a piece of water-soluble stabilizer if you are using a fluffy fabric
- temporary adhesive spray (I recommend Sulky KK2000)

Hoop your base fabric together with the appropriate stabilizer and attach the hoop to your embroidery machine. Load the design into your machine.

As with all appliqué designs, keep in mind that the colors shown on your machine’s screen do not necessarily correspond to the actual thread colors you should use. They are simply there to tell the machine when to stop. Please follow the color sequence included in the PDF file supplied with the downloaded design. If you are using a multi-needle machine, remember to set the necessary stop codes for appliqué and change the thread colors accordingly.
The stars are embroidered first. Next, the outline of the moon is embroidered.
Place your appliqué fabric over the stitched outline. In the third step, the machine will stitch the fabric in place. I recommend lightly spraying the back of the fabric with temporary adhesive spray so that it doesn’t move while stitching.
The second and third colors are actually the same light yellow, even though they are shown as different colors on the machine. This is intentional – it tells the machine to stop at the right moment. If both steps were assigned the same yellow thread color, the machine would join them together and stitch both steps without stopping.
After the third color has finished stitching, remove the hoop from the machine – do not release the fabric from the hoop! Carefully trim the moon close to the stitched line. Curved scissors with a blunt tip are ideal for appliqué. Be careful not to accidentally cut into the wrong place with the tip of the scissors!

Then put the hoop back into the machine and stitch color #4, which is the outline of the teddy bear. Now place your appliqué fabric over the appropriate area. If the fabric has hair or loops, place another piece of water-soluble stabilizer on top. Color #5 will then stitch the teddy bear outline again which will tack down the fabric.
You can then stitch the final color as well – these are the little details on the teddy bear’s face. Now your embroidery is finished. After removing the hoop from the machine and releasing the fabric carefully trim around the teddy bear silhouette.
Depending on what you find more comfortable, you can also do the trimming while the fabric is still tightly hooped. Sometimes it is easier to cut on a flat surface while the fabric is stretched in the hoop.

Add your own finishing touches
And finally, you can give the embroidery an even more three-dimensional look by adding ribbons, little flowers, beads or other embellishments.

You can download the embroidery design by clicking the image below. It will be available as a free download until the end of this week.

I hope you enjoy stitching it! And I’d love to see what you use the design for and what interesting fabrics you choose for your appliqué. Feel free to share your projects with me, I’d be happy to see what you have made.
I hope you have a lovely time embroidering! And there’s another free embroidery design coming later this week, so stay tuned. And don’t forget to use the advantage of my actual August sale .
.
You must be logged in to post a comment.